
What a year! I’ve been fortunate in having plenty to keep me busy – but that combined with a long running broadband problem kept the site quiet for most of the year. However, I’m now able to post pictures in seconds rather than hours so we’re good to go again.
If you’re a ‘Classic Bike’ reader, you may have seen my Lockdown Projects already but with magazine space tightly limited, I thought I’d expand the story here. I hope you enjoy it…
(By the way, I don’t know how to make a ‘cookie banner’ so suffice to say as far as I know the only data I collect is contained in old motorcycle books!)
I don’t think I’ve been without a project ever since I took up bikes. In my teens, projects were the only way to afford what I wanted and it’s a habit that’s stuck. Nobody recommends building bikes from projects nowadays but back in 1980, the classic bike scene as we know it today was in its infancy and there were still bikes turning up in sheds all the time. Complete bikes in largely original condition were gobbled up by restorers who, with a relatively wide choice weren’t too interested in ‘scrappers’, so we bottom feeders could pick them up affordably.
Back then, a project could cost between 10 and 30% the price of a restored bike, so as long as you did the work yourself and the big bits were useable, you could be on the road for half price or less. When I built my Gold Star in the early 90s it cost me £2500 total – including a new engine. Back then Goldies started around £6000. The big problem today is that basket cases can be 75% the price of a restored bike and in all too many cases they’re not dismantled bikes, they’re pieced together from rubbish – ‘bin find’ makes a better description than ‘barn find’….
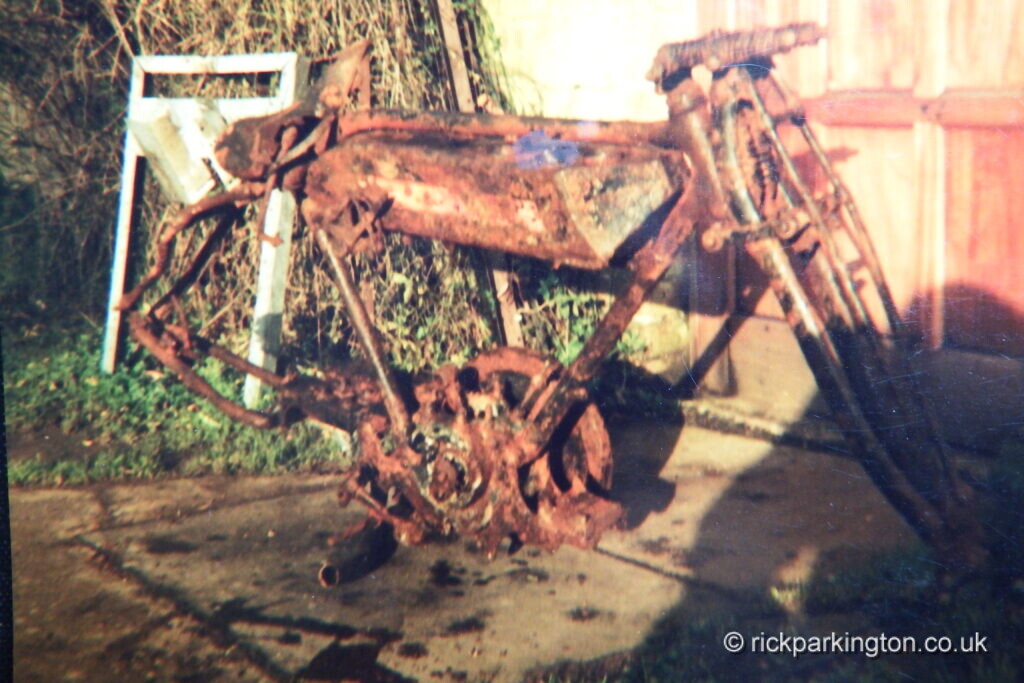 Which I guess is how you could describe my current project – but at least it didn’t cost me anything when I got it almost exactly 35 years ago, in December 1985. I was told it was a Blackburne – it certainly said so on the crankcases, although being a proprietary engine manufacturer Blackburne engines were fitted to many machines in the early 1920s. But by coincidence a photo of a 1921 Blackburne discovered in Wales had appeared in a recent magazine and it looked very similar…
 Well except that it was complete. Anything useful had been stripped off mine prior to burial; there were no wheels, the engine top end was missing and the bottom end was completely full of clay while the timing cover, gearbox and magneto had rotted completely away.
 Worse still, it seemed to have been run over by a heavy earth-moving vehicle – the frame was buckled more than bent and the tank, though still solid, had been pierced by a fork or similar – I know, it looks like bullet holes but there were no exits on the other side. I was 21, it was way beyond me to do anything with it – as was my BSA, really, so I gave it to my mate Miles so we could both have a bit of fun with ‘vintage projects.’
What impressed us was that having got the corroded-through crankcases apart and washed out, with a bit of oil the crank turned beautifully! Blackburne used long, plain bushes for main bearings and a cast bronze shell big end, which were fairly immune to corrosion – both features dating back to the engine’s grandfather, the (Geoffrey) DeHavilland design of 1904. They made a good bottom end for a slow revving engine.
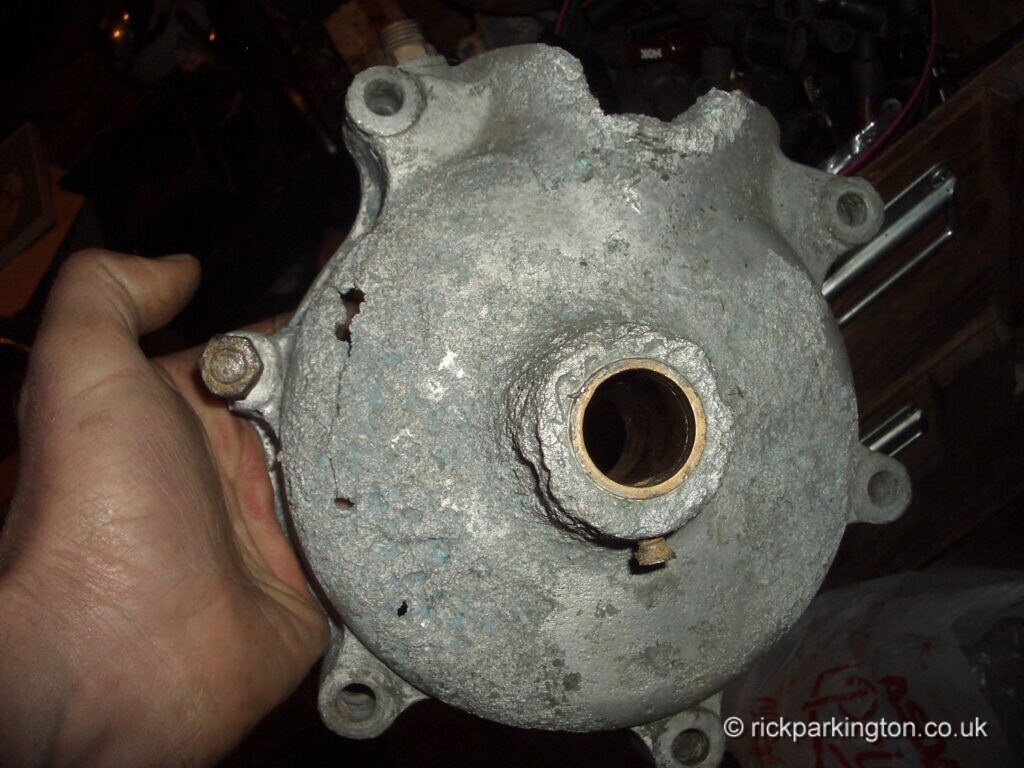
A decade later, now working for Indian specialist Motolux in Edinburgh, I had managed to build a vintage BSA, thanks to some very valuable help from our engineer Jules Watson and I began to feel confident to have a go at the Blackburne. Miles was happy to return it having done nothing with it save moving it from lockup to lockup – but there was bad news. In the course of those lockup moves some vital parts had been lost – the tank, footrest/brake pedal and perhaps worst of all the rear engine plates.
Plus exposure to the air after all those years underground had had a bad effect on the remaining bits which now definitely looked their age.
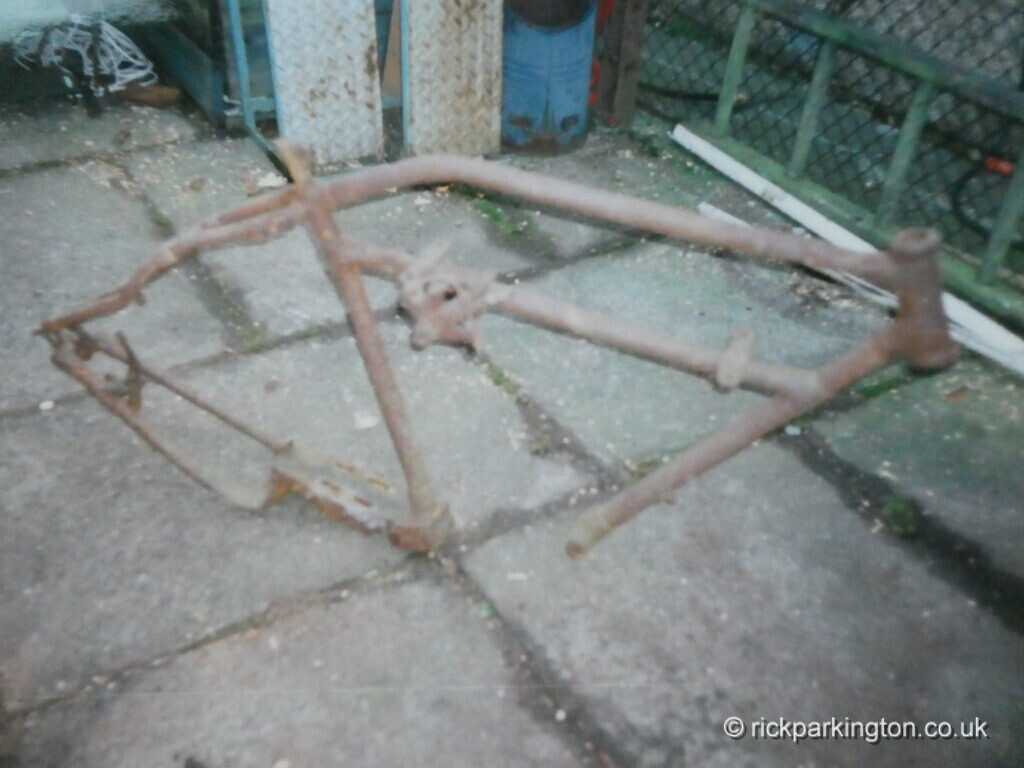 Even ignoring the rust, the frame was far worse than I remembered. Having been crushed, rather than bent in an accident, it was out of shape in several directions – like a shopping basket that’s been stamped on. Lack of wheel hubs had allowed front and rear fork to squash leaving no clue to where the fork ends should be and I couldn’t work out how bent the main frame was thanks to the loss of the rear engine plates.
It didn’t even end there because the top tube had rotted through in a peculiar manner – as if the steel was delaminating – and under the tank at the saddle end, the tank rail had suffered a heavy blow leaving a hammer-like dent in the tube – maybe it was gunshot damage after all…. 
I started with an easy bit, heating the rear fork tubes and making them at least look straight but I knew it was a bad way to straighten a tube. Metal has a ‘memory’ in its grain. If you bend a tube and straighten it cold, the grain structure will incline it to go back where it was – a bit like breaking a green stick and meshing the splinters back together so the break almost disappears. If you heat it, the grain rearranges and that memory is erased, so instead of force focussing on the bend, it finds the easiest place and you get a wavy tube. in this case it was so bad I felt if I didn’t use heat it would break. Truth is, it needed re-tubed – as did the saddle stays which were well beyond straightening.
Although less bent, the front frame was a bigger problem – but the rotted top tube actually helped in one way; it told me the year of the bike… The 4hp Blackburne was launched in February 1919 but as with many companies so soon after the War, production was held up while industry tired to get back to normal amidst problems ranging from equipment worn out from 24-hour munitions work to industrial action, arising from the major social changes to the ‘old ways’ the War brought about. It was a time when bike prices soared as men returned from War with a gratuity to spend and aspirations to travel further afield for work than their feet would take them. Enterprising souls who had placed early orders were even selling their place in the queue to the highest bidder and it wasn’t until late Autumn 1919 that Blackburnes appeared in showrooms. While the February launch pictures show the new Burman gearbox, actual 1919 production bikes had Sturmey Archer, like pre-war models.
The engine’s outside flywheel prevented fitting a crankshaft shock absorber and although the Burman box had rubbers in the clutch to deal with the load, Sturmey clutches did not. This had caused no problem with the forgiving belt drive of older bikes but on an extended road test, the new Blackburne managed to break not one but two primary chains – and sturdy 5/8 x 3/8 (530) rear size chains at that. So from 1920, as soon as they were available, Burman boxes were fitted and there were no further problems although the Sturmey remained available as an option. Although my bike’s gearbox had dissolved in the soil, it had a Burman gear quadrant on the tank so it had to be post 1919. In the 1921 catalogue, leather toolbags are shown on the rear carrier but this 1920 catalogue picture of a still-Sturmey equipped 4hp shows a tank top tool box. The localised rot on my frame suggested something had collected water at that point and I’m certain it was one of these toolboxes, filling with rainwater and slowly rusting away. That and an early engine number (853) made it highly probably mine was a 1920 model – as well as suggesting it deteriorated outdoors (possibly as a .22 rifle target) for some time before it was buried.
Without dimensions I couldn’t do anything with the frame – even though I eventually managed to contact the only other 4hp Blackburne owner I’d heard of – it turned out his frame was slightly different. But then, out of the blue, Miles rang to say he’d found an engine plate under the floor of his shed – just one but at least I now had the measurements I needed making it worth starting the job. But of course it was now evident just how bent the frame really was and I had no idea how to deal with it – particularly the dented tube – without taking the whole lot apart and here my ignorance led me into deep water. Having access to brazing gear at work I tried to melt the brazed joints but found it harder than I expected. There are two problems. First brazed joints are pinned and if you don’t find the pins and drill them out, the tube will not move. Second and more troublesome is the fact that it is very difficult to melt a brazed joint. Because you are heating the outside of a thick casting, it takes a huge amount of heat to get through to the tube within and only when both are glowing red will the braze release. It’s one thing when you’re dong the brazing, with the joint red hot you can add the extra heat to get the braze flowing with the torch as you work round but to release the joint you need uniform heat – these frames were assembled in a brazing hearth where the joint was heated on all sides – the concentrated flame of a torch makes it easy to overheat and damage the lug – in extreme cases the heat can cause the braze to alloy with the casting, making it uselessly brittle.
The safest way to separate a frame is by sawing through the tube and machining out the cut off end. I didn’t know that at the time but in my struggles I did cut the tube and discovered something very interesting. The reason for the ‘peeling’ corrosion you can see in the photo above is that the top tube (described as ‘reinforced section’ in the catalogue) was not what it seemed…
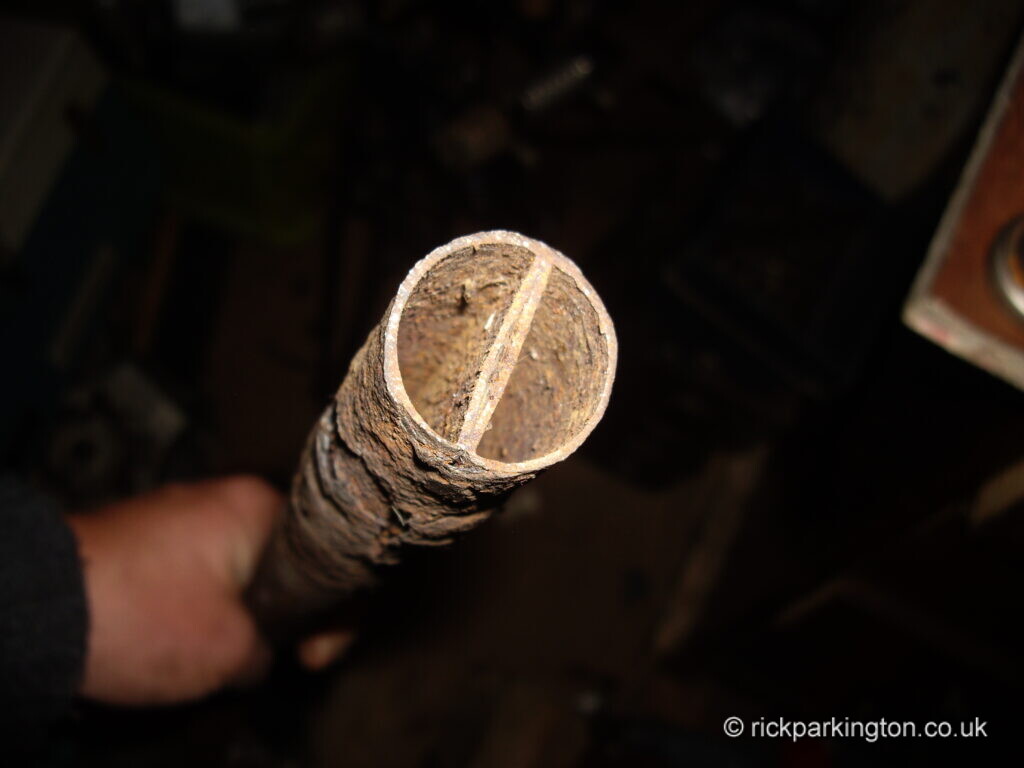 It’s actually two thin-walled D section tubes inside a thin ‘sausage skin’ tube on the outside; this I’m told was period aircraft technology – strong but very light. Interesting – but the rest of the job was a disaster. Even if I’d know about boring out, the lug was so thin-walled that I think it would have collapsed. I assumed it was made that way – only when I later got the 1922 frame did I realise how badly they had corroded.
Anyway after cutting out the top tube, attempts to unbraze the saddle lug to access the dented tube just led to it breaking in half. The full horror of this is revealed below; fortunately, dating back to roll film days, the pictures I have of this sorry occasion are few and indistinct…
 But you can see how the saddle tube is actually curved rather than bent – it was also twisted. And you can also see the dent in the tube – it’s that grey/blue bit, where a cycle pump clip hangs down like a fang. Faced with this today, I’d drill a hole in the dent, heat it and try to draw it out from the middle with a screw – or even cut out the dent and weld in a new piece, shaped like a Roman’s shield. I would certainly patch the top tube – the D tubes inside were fine, only the ‘skin’ was rusted; and if all that sounds a bodge wait till you hear what actually happened…
Do not read on if you are either 1) looking for instructions on how to repair vintage frames 2) of a sensitive disposition or c) employed by my insurance company; this is about to get messy.
 I’d managed to pick up a good 1924 550cc engine and a later type Burman gearbox both of which were not correct but would fit, so filled with enthusiasm I set about reassembly. I heated the dented tube and pressed a bar through it to reform the dent, that worked but how would I get around the broken lug? I welded a stub to the saddle tube that fitted inside the tank tube and lug remains and brazed it all together before welding the two halves of the lug back together. Next, Willie at work helped me sand-fill, heat and bend a replacement top tube; I was pleased we got it the right shape and without ovalling at the bend – but didn’t know I should be using CDS tube (cold drawn seamless) not ERW (electric resistance welded) – ie common or garden seamed tube. Again I used sleeves to fit it but the lugs themselves were so thin that it looked like the tubes were butted to them – badly; even my attempt to fill it all in with braze couldn’t disguise it the mess I had created.
 Well, I guess we all have our cupboard dwelling skeletons – and they do say confession is good for the soul… In truth I don’t feel soooo bad. I hate it when ignorance ruins an irreplaceable item but in this case the frame was so far gone I doubt any proper frame repairer would have touched it. Afterwards, half of me wished I’d just left it as it came out of the ground – at least it was a curio. I could have covered it in oil and kept it as the world’s coolest garden sculpture – or exhibited it at shows as an example of what can happen to a bike in 80 years.
As it was, even with the front frame in one piece enough to fit the engine, the back end was still all over the place – I didn’t have a tank or wheels, carb, magneto and loads of other bits…so everything went back in the loft and there it stayed.
That is until February 2015 when, en route home from visiting Judy’s mum in Devon, we called in at the Shepton Mallet autojumble and something on the back of a flatbed truck stopped me in my tracks…
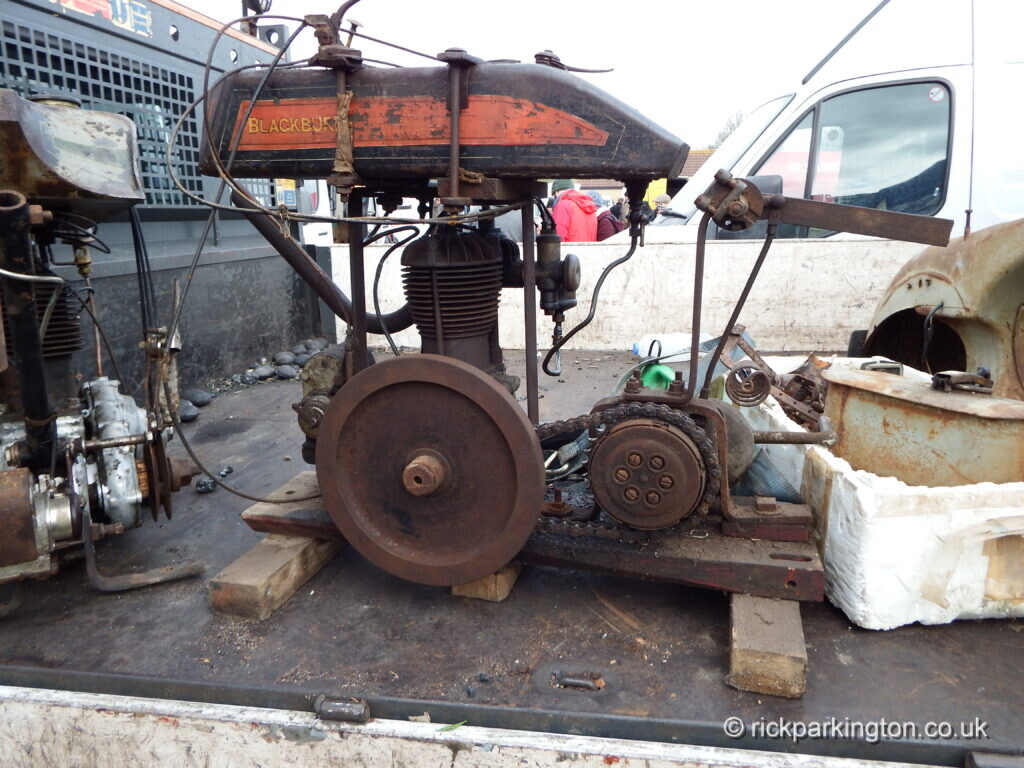 This is not something you see often nowadays. It used to be quite common to take an old bike, scrap the forks and rear frame, stick the wheels on a cart and bolt the remaining middle bit to a girder or timber beam. Self contained with a tank, ignition magneto, maybe even a clutch and gearbox it made a pretty sophisticated portable power plant for a farmer’s sawbench. Consequently forks and rear frames tend to be harder to find for flat tankers than front frames and engines. It would have been perfect if this one still had its front frame – but even so…
I enquired – and winced – at the price; but as I walked away I got to thinking. Here was an original engine, gearbox, clutch, carb, magneto, most of the levers all topped off with a beautiful original paint tank. Maybe it wasn’t so expensive after all… Especially since I had most of the rest – by now, naturally, the worst of it was forgotten; so I struck a deal.
Informing my mate (and VMCC Blackburne and OEC Marque specialist) Martin Shelley of my find he offered another option. Martin had bought a basket case Blackburne on Ebay with a knackered tank and incomplete engine, just to save it really and was happy to pass it on for what it cost him – which was pretty cheap – cheaper than the ‘sawbench’ project anyway.
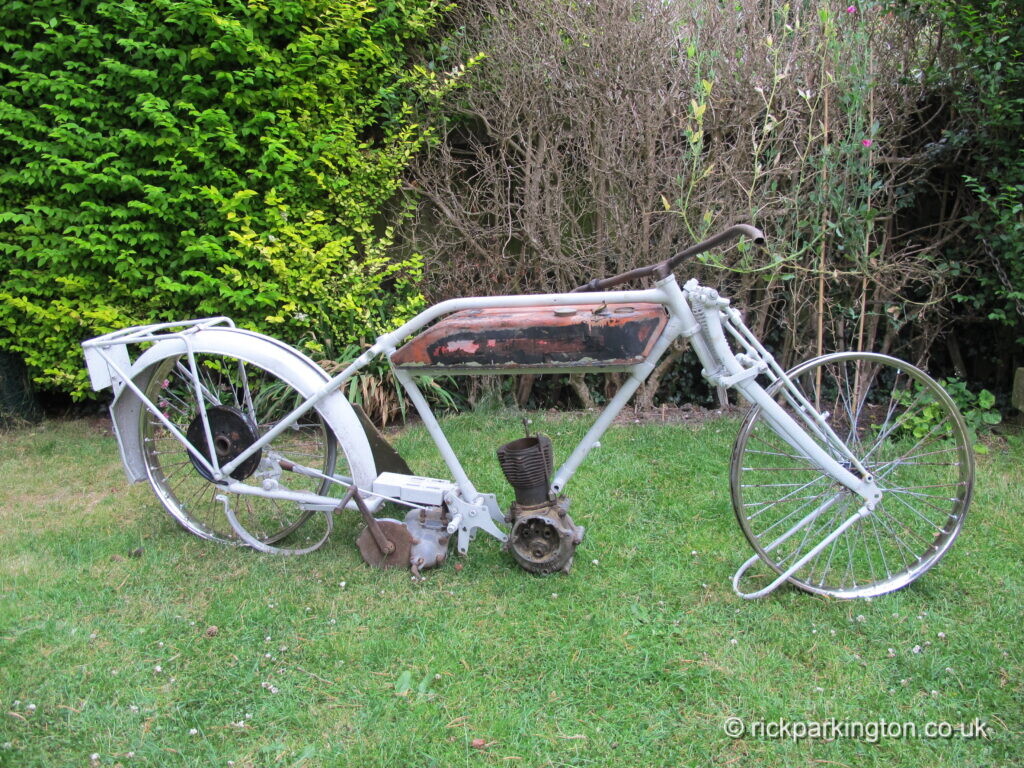 This seemed like the obvious solution. The 550cc engine I already had was correct for this bike and the ‘sawbench’ project would yield a good tank, carb, magneto, levers etc. Although I’d be sad not to have revived the original claypit bike it would have been a bit of a deathtrap with a 550cc motor and at least some of its parts could live on in this new bike.
But it did occur to me that having started with half a bike, I’d then bought another half to complete it and had now bought another other-half which essentially meant I still had half a bike left over to do something with; and that’s when I thought of the Scarlet Runner…
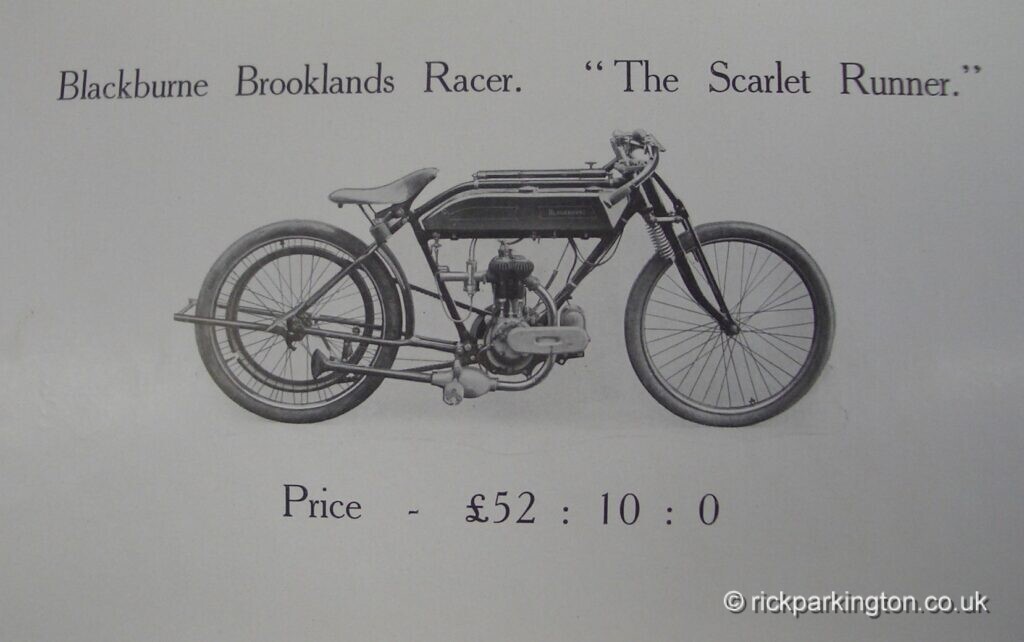 You have to admit, it’s got a look about it.
In 1914, life was good for Burney and Blackburne, business was taking off and they made a highly regarded machine – maybe it was time to build a racer. In the summer of 1914, Sturmey Archer created the three speed countershaft gearbox that would effectively terminate the Veteran era of run and jump motorcycling. For the 1915 range, Blackburne proposed extending the frame of their single speed/ 3 speed hub gear (think bicycle) model to accept a Sturmey gearbox clamped to the rails between engine and rear wheel. This longer frame looked a bit ungainly – especially compared to the other new model – the Scarlet Runner. This was a stripped back, short-framed, single-speed track fighter with no front brake and swooping dropped handlebars. At that time Brooklands was Britain’s only race circuit. On the huge, banked, concrete oval you got up to maximum speed and stayed there, things like gears (and brakes) were unnecessary weight so they were generally done without. However little you know about Vintage bikes, it’s pretty clear this thing means business; as soon as I saw it I fell in love with it – but there’s no point looking for one. Although it made the 1915 catalogue I believe only a prototype was built – and that was almost certainly broken up during the War. Blackburne carried on making bikes until civilian production was prohibited in 1917 but apart from a couple of meetings for servicemen, Brooklands closed for the duration leaving no demand for racers. Come armistice, 57,000 Sturmey Archer countershaft-equipped WD Triumphs had convinced the world that single speed was a thing of the past and the Scarlet Runner was never heard of again; another victim of the war to end all wars.
Since I had a front frame, tank, an engine, a pair of suitable hubs and rims, a carb (with exactly the right air trumpet) a saddle and a few other odds I started thinking about building a replica – there’s not all that much to a veteran bike, really; all I needed to find was a set of Druid forks, a rear drive belt rim and a rear frame – but that, being unique, would have to be made anyway. In view of the difficulties I had already experienced that may sound a bad idea but there is a reason I am the right person for the job.
This is the Scarlet Runner’s closest surviving relative, in fact it’s the oldest complete Blackburne known… and it lives in my garage. 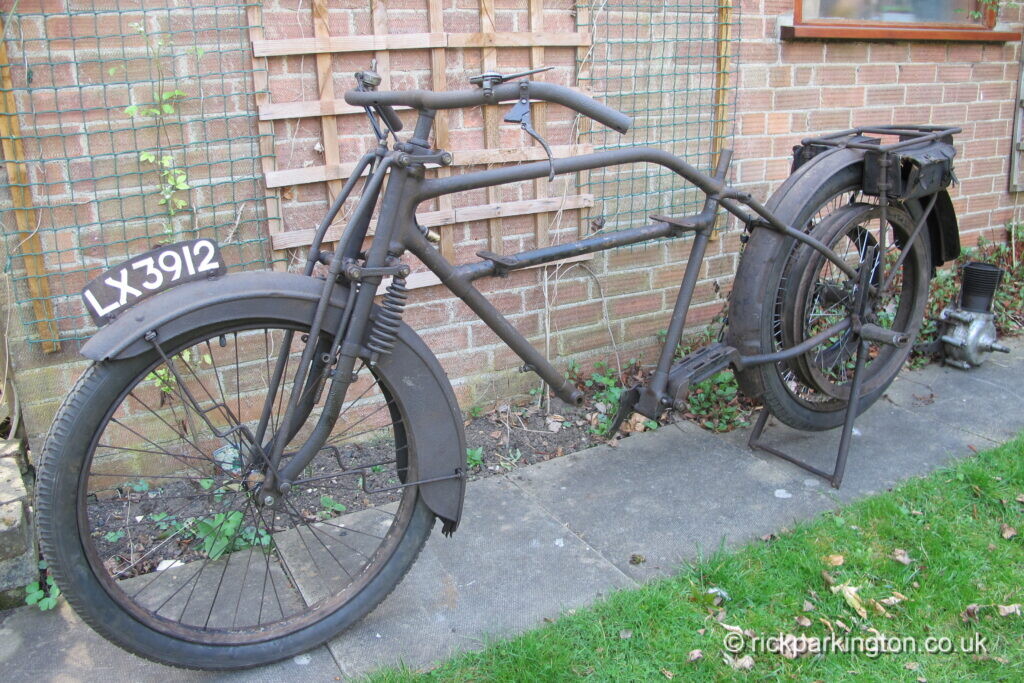 That means I have something to copy; the only thing is, this is a year newer, a 1916 model. Although the forks, tank, wheels and many other parts would be common to the Runner, 1916 is the year that direct belt drive was finally dropped. Along with it went the ‘dual purpose’ rear frame in favour of a new design with a dedicated casting for the gearbox mount. Add to this the fact that the Runner had a shorter wheel base than the other 1915 models and on the face of it the 1916 bike is little help.
But not so; several frame parts were the same – plus you get a sort of ‘construction overview’ – for example, tubes go over, not inside, the lugs.
 So having this bike is one of the things that made the job worth attempting. I obtained a set of forks and a rear belt rim, also from my friend Martin Shelley, who also supplied a roughed-out front pulley he’d started making for an early engine. That was a few more jobs ticked off and I felt ready to announce the start of the job in Classic Bike; here’s the result…
 Try to ignore the absence of a rear frame…I like to think I’ve caught the look of the bike from that 1915 photo – but this isn’t something to hang on the wall of a bar. There’s a lot to do from here – but if I can turn this into a vaguely rideable motor cycle it will be well-worth the effort – and the 35 year wait!
Sorry for such a long post but I’m hoping it explains to some degree why I have taken on this rather over-ambitious project. Next time I’ll explain the trials and tribulations of the job so far – and take a look at the other two bikes I rashly decided to build at the same time. Meanwhile, I’d better get back to work….
Cheers Rick
Rick, your enthusiasm is contagious! Thanks
Hi Bob, thanks! But you do realise once I’ve made everybody in the world a Blackburne enthusiast, you will all be in my power! Brrroooo-ha-haaaa!!
Cheers Rick
Excellent article.i am a long term reader of classic bike and look forward to seeing progress on the runner.keep up the good work!
Thanks Neill, well can’t stop now! Had a bit of a major crisis last month as you’ve maybe read but made a couple of discoveries that tipped things back in my favour; I reckon the bike will be a cracker…not literally I hope…!
Cheers Rick
Rick,I do believe if you were a paleontologist you would have a dinosaur back living by now!
Ha ha, thanks Si – mind you thinking back to ‘Jurassic Park’ by comparison reconstructing these old bangers seems very safe indeed!
I guess being preserved in a lump of amber is less corrosive than a claypit…!
Cheers Rick
An amazing project, I have been offered a similar engine and might like to build on like this one day.
I need CAMs for the engine , any ideas were I might find a set?